As winter approaches, homeowners must prioritize protecting their property from the potential damage caused by freezing temperatures. One critical aspect of winterizing your home is ensuring that your pipes are adequately insulated. Frozen pipes can lead to burst pipes, water damage, and costly repairs. Fortunately, with the right techniques and materials, insulating your pipes can be a simple and effective way to prevent these problems.
In this guide, we’ll walk you through everything you need to know about how to properly insulate your pipes for winter. We will also discuss some essential tips that professionals like Chrome Heating Air Conditioning in Plano, TX, recommend to keep your plumbing safe and functional throughout the colder months.
Why Insulating Your Pipes is Important
The main reason to insulate your pipes during the winter is to prevent them from freezing. When water freezes inside pipes, it expands, creating pressure that can cause the pipe to crack or burst. This can lead to extensive water damage, costly repairs, and the inconvenience of being without running water. Additionally, insulated pipes can help improve the overall energy efficiency of your home by reducing heat loss from hot water pipes, saving you money on energy bills.
Proper insulation is essential, especially in areas like attics, crawl spaces, and exterior walls where pipes are more exposed to cold air.
Materials You’ll Need for Pipe Insulation
Before you begin, gather the necessary materials to ensure the job is done correctly. Here are some of the most common materials for insulating pipes:
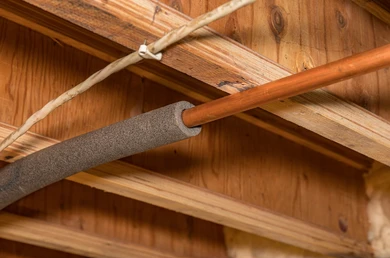
- Pipe Insulation Foam Tubes: These are pre-slit foam tubes that wrap around the pipes. They come in various sizes to fit different pipe diameters and are easy to install. Foam insulation is a popular choice for its affordability and effectiveness.
- Pipe Wrap Insulation: This type of insulation consists of a flexible material like fiberglass or foam that you wrap around the pipes. It’s ideal for pipes with irregular shapes or in areas where foam tubes are difficult to install.
- Heat Tape: Heat tape is an electric cable that wraps around pipes to provide warmth and prevent freezing. It’s especially useful for outdoor pipes or pipes that are exposed to extremely cold temperatures.
- Duct Tape: Duct tape is used to secure insulation materials in place and seal any gaps.
- Pipe Insulation Tape: This adhesive-backed tape is specifically designed to wrap around pipes and is easy to apply in tight spaces or on complex pipework.
- Gloves and Safety Gear: Insulating materials like fiberglass can irritate the skin, so wearing gloves and other protective gear is important while working.
Step-by-Step Guide to Insulating Your Pipes
Step 1: Identify the Pipes That Need Insulation
The first step is identifying which pipes in your home are at the highest risk of freezing. Generally, you should focus on pipes located in unheated or poorly insulated areas, such as:
- Attics
- Basements
- Crawl spaces
- Garages
- Exterior walls
- Outdoor faucets and hose bibs
These areas are more susceptible to cold air and require proper insulation to prevent freezing.
Step 2: Measure the Pipes
Once you’ve identified the pipes, measure their length and diameter to determine how much insulation you’ll need. Insulation foam tubes and wraps come in various sizes, so it’s essential to get the right size to ensure a snug fit. Most home improvement stores carry insulation materials based on pipe diameters.
Step 3: Clean the Pipes
Before applying insulation, clean the pipes to remove any dirt, dust, or moisture. This will help the insulation adhere better and create a more effective barrier against cold temperatures.
Step 4: Install the Insulation
Now it’s time to install the insulation. Follow these steps for each type of material:
- Foam Tubes: Simply open the pre-slit foam tube and place it around the pipe. Make sure the insulation fits snugly around the pipe with no gaps. Use duct tape to seal the seams and secure the insulation in place. Cut the foam to size if necessary.
- Pipe Wrap Insulation: Wrap the insulation material tightly around the pipe, overlapping each layer to avoid any exposed sections. Use duct tape to secure the ends and ensure the wrap stays in place.
- Heat Tape: Follow the manufacturer’s instructions for wrapping heat tape around the pipes. Be sure to plug it into a grounded outlet if it requires electricity. Heat tape is highly effective for exposed pipes and can help prevent freezing in extreme conditions.
Step 5: Seal Any Gaps or Joints
After installing the insulation, inspect the entire length of the pipe to ensure there are no gaps or exposed sections. Pay close attention to bends, joints, and valves. Use pipe insulation tape or additional foam pieces to cover any areas that need extra protection. This step is crucial to ensure there are no weak points where cold air can penetrate.
Step 6: Insulate Outdoor Faucets and Hose Bibs
Outdoor faucets are particularly vulnerable to freezing and should be insulated or turned off for the winter. Use foam faucet covers to protect them from the cold. If possible, shut off the water supply to outdoor faucets and drain the lines to prevent any remaining water from freezing.
Additional Tips for Winter Pipe Protection
Beyond insulating your pipes, here are a few more tips to protect your plumbing during the winter months:
- Let Faucets Drip: During extremely cold weather, letting your faucets drip slightly can relieve pressure in the pipes and reduce the risk of freezing.
- Open Cabinet Doors: In areas like kitchens and bathrooms, open the cabinet doors under sinks to allow warm air from your home to circulate around the pipes.
- Seal Gaps and Cracks: Check for gaps or cracks in your home’s walls, floors, and foundation where cold air can enter. Use caulk or foam sealant to fill any holes, especially around pipes that penetrate exterior walls.
- Keep Your Home Warm: Maintain a consistent temperature in your home, even when you’re away. Keeping the thermostat set at 55°F or higher can help prevent pipes from freezing.
- Drain Water Systems When Away: If you plan on being away from your home for an extended period, consider draining your water system. This is especially important if temperatures are expected to drop significantly.
Why Choose Professional Pipe Insulation Services
While insulating pipes can be a DIY project, there are several reasons to consider hiring a professional. A company like Chrome Heating Air Conditioning in Plano, TX, can assess your home’s plumbing system, identify vulnerable areas, and provide expert insulation services. Professional insulation ensures that all pipes, including those in hard-to-reach places, are adequately protected.
Moreover, a professional service can recommend the best insulation materials for your specific needs and climate. This can save you time and provide peace of mind knowing that your home’s pipes are well-protected during winter.
Conclusion
Properly insulating your pipes for winter is a simple yet essential step in protecting your home from the risks of freezing temperatures. By taking the time to insulate exposed pipes, seal gaps, and follow additional winterization tips, you can prevent frozen pipes and the costly repairs that come with them. For homeowners in the Plano, TX, area, Chrome Heating Air Conditioning offers expert services to ensure your plumbing system is well-prepared for the winter months.
FAQ
- Why is it important to insulate pipes for winter?
Insulating your pipes helps prevent freezing, which can cause pipes to burst and lead to costly repairs. It also improves energy efficiency by reducing heat loss from hot water pipes. - What type of insulation is best for protecting pipes in winter?
The most commonly used materials for pipe insulation are foam, fiberglass, and rubber. Foam pipe insulation is typically the easiest to install and provides good thermal protection. - Which pipes need to be insulated for winter?
Pipes located in unheated areas such as basements, attics, garages, and crawl spaces should be insulated. Pipes near exterior walls are also at risk of freezing and should be protected. - How do I know if my pipes need additional insulation?
If your home is in a region with extremely cold winters or if you’ve experienced frozen pipes in the past, it’s a good idea to inspect your pipes for gaps in insulation or consider adding extra layers. - Can I insulate the pipes myself, or should I hire a professional?
Many homeowners can install pipe insulation on their own using foam tubing or wraps. However, if your pipes are in difficult-to-reach areas, it might be better to hire a professional to ensure proper installation. - How thick should the pipe insulation be for winter protection?
The recommended thickness depends on the climate. In very cold regions, insulation with a thickness of at least 1 inch is generally advised for adequate protection. - Can insulating my pipes save on energy costs?
Yes, insulating hot water pipes can reduce heat loss, which helps your water heater operate more efficiently, potentially lowering your energy bills. - What should I do if my pipes have already frozen?
If pipes are frozen, it’s important to turn off the water supply and gently warm the pipes using a heat source such as a space heater or a hairdryer. Avoid using open flames or excessive heat. - How often should pipe insulation be replaced?
Pipe insulation should last several years, but it’s a good idea to inspect it annually for wear and tear, especially before winter, and replace it if necessary. - Can insulating my pipes prevent condensation?
Yes, insulating cold water pipes can help reduce condensation, which can lead to moisture damage in your home.