Installing a new faucet may seem like a time-consuming task, but with the right tools and a clear step-by-step guide, you can complete it in just 10 minutes. Whether you’re upgrading your kitchen or bathroom faucet for a modern look or simply replacing a worn-out one, this guide will walk you through the process in a straightforward manner. No need to be a seasoned plumber to get it done—just follow along, and you’ll have a new faucet installed in no time!
Tools and Materials You’ll Need
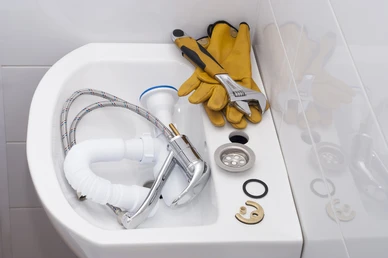
Before starting, make sure you have the following tools and materials ready. Preparing everything in advance will help you stick to that 10-minute timeframe:
- New faucet
- Basin wrench
- Adjustable wrench
- Plumber’s tape
- Silicone sealant (optional)
- Bucket or towel (to catch any water)
- Cleaning cloth
Now that your tools are ready, let’s dive into the step-by-step installation process.
Step 1: Turn Off the Water Supply
The first and most important step is to turn off the water supply to the sink. Locate the shutoff valves beneath the sink and turn them clockwise to stop the water flow. If your sink doesn’t have shutoff valves, you may need to turn off the main water supply to your home.
After turning off the water, open the faucet to drain any remaining water in the lines. This will prevent any mess during installation. Keep a bucket or towel handy to catch any water that might drip out during the process.
Step 2: Remove the Old Faucet
With the water turned off, you’re ready to remove the old faucet. Use your basin wrench to loosen the nuts securing the faucet to the sink from underneath the countertop. Depending on the model of your old faucet, there might be one or two nuts to unscrew.
After removing the nuts, gently pull the old faucet out from the top of the sink. Be sure to also disconnect the water supply lines by unscrewing them with your adjustable wrench. Once the old faucet is removed, take a moment to clean the sink area, removing any old sealant or debris.
Step 3: Install the New Faucet
Now it’s time to install the new faucet. Most modern faucets come with straightforward installation instructions, but the general steps are similar across different models. Start by inserting the faucet through the pre-drilled holes in your sink. Make sure the faucet is aligned properly.
From underneath the sink, secure the faucet using the provided nuts. Hand-tighten them first, then use your basin wrench to tighten them a bit more, ensuring a snug fit without over-tightening. Over-tightening could damage the sink or faucet.
Step 4: Connect the Water Supply Lines
Next, connect the water supply lines to the faucet. If your new faucet didn’t come with water supply lines, you might need to reuse the old ones or purchase new ones. Attach the lines to the hot and cold water valves under the sink, making sure they are properly tightened with your adjustable wrench.
For added security and to prevent leaks, wrap the threads with plumber’s tape before attaching the water supply lines. This step can help create a watertight seal.
Step 5: Test the Faucet
With everything connected, turn the shutoff valves back on by rotating them counterclockwise. Slowly open the faucet to check for leaks. Let the water run for a minute to make sure there’s a steady flow of both hot and cold water. Inspect the connections underneath the sink to ensure there are no drips or leaks. If you spot any leaks, use your wrench to tighten the connections a little more.
If everything looks good, congratulations—you’ve successfully installed a new faucet in just 10 minutes!
Additional Tips for a Smooth Installation
1. Use Silicone Sealant for Extra Stability
Some faucets may require or benefit from a small bead of silicone sealant around the base to prevent water from seeping under the fixture. This is especially useful if your sink is uneven or has gaps around the faucet holes. Apply the sealant sparingly and wipe away any excess to maintain a clean appearance.
2. Choose the Right Faucet for Your Sink
Before purchasing a new faucet, ensure it matches the configuration of your sink. Most sinks have either one, two, or three holes for faucet installation. If your new faucet has a different hole configuration, you may need an adapter plate or a different faucet model.
3. Check Water Pressure and Flow Rate
After installation, if you notice that the water pressure or flow rate is lower than expected, check the aerator at the faucet spout. Sometimes, debris from the plumbing lines can get stuck in the aerator during installation. Simply unscrew the aerator, clean it out, and reattach it.
4. Regular Maintenance Extends Faucet Life
Installing a new faucet is a quick task, but keeping it in great condition requires regular maintenance. Clean the faucet with a gentle cleaner and soft cloth to prevent buildup. Regularly check for leaks, and address them promptly to prevent water damage.
Conclusion
Installing a new faucet doesn’t have to be a daunting task. With the steps outlined above, you can have a fully functional and stylish faucet in place within just 10 minutes. Whether you’re upgrading your bathroom or kitchen, this simple project can make a big impact on the look and functionality of your home.
For professional assistance or more complex plumbing needs, consider reaching out to Chrome Heating Air Conditioning for expert service in the Plano, TX area. With their trusted team of professionals, you can ensure that every faucet installation or plumbing task is handled with precision and care. Now, with your newly installed faucet, you can enjoy improved water flow and an upgraded aesthetic in your home!
FAQ
- Is it really possible to install a new faucet in just 10 minutes?
Yes, with the right tools and preparation, installing a new faucet can take as little as 10 minutes, especially if it’s a simple replacement and the plumbing is in good condition. - What tools do I need to install a faucet quickly?
You’ll need a wrench, pliers, plumber’s tape, and possibly a basin wrench to remove and install the faucet easily. - Do I need to turn off the water supply before installing a new faucet?
Yes, it’s important to turn off the water supply to avoid any leaks or water damage while replacing the faucet. - Can I install any type of faucet in 10 minutes?
Simple faucets designed for easy installation can be installed quickly. However, more complex faucets with extra features like pull-out sprayers or multiple handles may take longer. - What should I do if I encounter leaks after installation?
Double-check that the connections are tight, and that you’ve applied plumber’s tape to all the threaded parts. If the problem persists, there may be an issue with the faucet or the plumbing that requires further attention. - Do I need any plumbing experience to install a faucet in 10 minutes?
Basic DIY knowledge is helpful, but most modern faucets come with instructions that make installation easy, even for beginners. - How can I speed up the faucet installation process?
Preparing all the tools ahead of time, reading the installation guide, and ensuring you have easy access to the plumbing can significantly reduce the installation time. - What should I do if my sink doesn’t have standard faucet holes?
If your sink doesn’t have standard holes, you might need to adjust your faucet selection or drill new holes, which will increase the installation time. - Is it necessary to use plumber’s tape when installing a faucet?
Yes, plumber’s tape is recommended to ensure a watertight seal on threaded connections. - Can I install a new faucet without removing the old one?
No, the old faucet must be removed first before installing a new one. Make sure to remove it carefully to avoid damaging the sink or plumbing.