A running toilet is not only annoying, but it can also waste a significant amount of water, driving up your utility bills. Luckily, fixing a running toilet is usually a simple task that can be completed in under an hour, even if you’re not a seasoned DIY enthusiast. In this guide, we’ll walk you through the steps to troubleshoot and fix the most common causes of a running toilet, using basic tools that most homeowners already have on hand.
Step 1: Gather Your Tools and Materials
Before you start, make sure you have all the tools and materials you’ll need to fix your running toilet. The good news is that you won’t need anything too specialized:
- Adjustable wrench
- Flathead screwdriver
- Replacement parts (depending on the problem, this could include a new flapper, fill valve, or flush valve)
- Towel or sponge (for drying up any water spills)
- Gloves (optional)
Once you’ve gathered your tools, turn off the water supply to the toilet. The valve is typically located on the wall behind the toilet. Turn it clockwise to shut off the water flow.
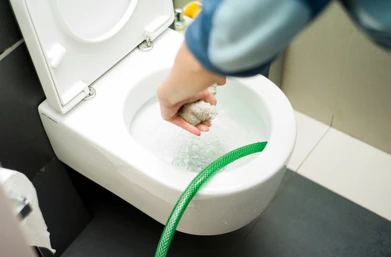
Step 2: Inspect the Flapper
The flapper is one of the most common culprits behind a running toilet. The flapper is the rubber or plastic stopper at the bottom of the tank that lifts when you flush, allowing water to flow into the bowl. Over time, flappers can warp, crack, or simply wear out, preventing them from sealing properly.
- Remove the tank lid and set it aside.
- Flush the toilet and watch the flapper in action. If the flapper doesn’t close completely after flushing, it’s likely worn out and needs to be replaced.
How to replace the flapper:
- Turn off the water supply.
- Drain the tank by flushing and then sponging out any remaining water.
- Disconnect the chain attached to the flush handle.
- Remove the old flapper by unclipping it from the bottom of the overflow tube.
- Install the new flapper by clipping it in place and reattaching the chain. Make sure the chain has some slack but is not too loose.
Once you’ve replaced the flapper, turn the water back on and see if the toilet stops running.
Step 3: Check the Fill Valve
If replacing the flapper didn’t solve the problem, the next thing to check is the fill valve. The fill valve controls the water level in the tank, and if it’s malfunctioning, water may continuously flow into the tank, causing it to overflow into the overflow tube and leading to a constantly running toilet.
- Inspect the water level. If it’s above the overflow tube, your fill valve may be set too high or malfunctioning.
- Adjust the fill valve. Many modern fill valves have an adjustment screw that you can turn to lower the water level. Use a screwdriver to turn the screw clockwise and lower the water level in the tank.
If adjusting the water level doesn’t fix the issue, you may need to replace the fill valve.
How to replace the fill valve:
- Turn off the water supply and drain the tank.
- Disconnect the water supply line from the bottom of the fill valve.
- Remove the old fill valve by loosening the nut at the bottom of the tank.
- Insert the new fill valve and tighten the nut.
- Reconnect the water supply line and turn the water back on. Adjust the water level as needed.
Step 4: Examine the Flush Valve
If the flapper and fill valve are functioning correctly but the toilet is still running, the issue may lie with the flush valve. The flush valve is located at the bottom of the tank and includes the seat that the flapper seals against. If this seat is cracked or damaged, water can leak into the bowl, causing the toilet to run continuously.
To check the flush valve:
- Inspect the valve seat. Look for cracks or rough spots on the valve seat where the flapper seals. Even a small imperfection can cause water to leak.
- If you notice any damage to the valve seat, it may need to be replaced.
How to replace the flush valve:
- Turn off the water supply and drain the tank.
- Remove the tank from the bowl by unscrewing the bolts that secure it.
- Once the tank is removed, you can access the flush valve from underneath.
- Remove the old flush valve and install a new one according to the manufacturer’s instructions.
- Reattach the tank to the bowl, reconnect the water supply, and turn the water back on.
Step 5: Adjust the Chain
Sometimes the simplest fixes can solve the problem. If the chain connecting the flush lever to the flapper is too short or too long, it can prevent the flapper from sealing properly.
To fix this:
- Check the chain. If it’s too tight, the flapper may not close fully after a flush. If it’s too loose, it may not lift the flapper enough to allow a full flush.
- Adjust the length. Simply reposition the hook on the chain to give it a little more or less slack as needed.
Step 6: Test the Toilet
After you’ve made adjustments or replaced parts, it’s time to test the toilet and ensure the running problem is resolved. Turn the water supply back on and let the tank fill up. Flush the toilet and observe the tank for a few minutes. If the water stops filling once it reaches the correct level and the toilet no longer runs, congratulations—you’ve successfully fixed your running toilet!
If the problem persists despite trying the above steps, there may be a more complex issue that requires professional attention.
When to Call a Professional
While most running toilet problems can be fixed with basic tools and a little DIY effort, sometimes the issue may be more complicated. If you’ve tried the steps above and the toilet is still running, or if you feel uncomfortable performing any of the tasks, it may be time to call a professional.
The experts at Chrome Heating Air Conditioning in Plano, TX can help with more advanced repairs, ensuring your plumbing system is functioning properly and efficiently. Whether it’s a running toilet, leaky faucets, or any other plumbing issue, their team has the experience and tools necessary to get the job done quickly and professionally.
Conclusion
Fixing a running toilet is a task that most homeowners can handle in under an hour with the right tools and knowledge. By troubleshooting the most common causes—flapper, fill valve, flush valve, and chain adjustments—you can save water, avoid costly utility bills, and prevent more significant plumbing issues down the road. However, if you encounter a problem that’s beyond your expertise, don’t hesitate to contact Chrome Heating Air Conditioning in Plano, TX, for professional assistance.
FAQ
What are the most common causes of a running toilet?
- A running toilet is usually caused by a faulty flapper, a broken fill valve, or an improperly adjusted float arm. These parts are key to controlling water flow and stopping the water when the tank is full.
2. How can I identify if the flapper is causing the toilet to run?
- You can check the flapper by inspecting if it’s sealing the flush valve properly. If the flapper is worn or damaged, it will allow water to keep flowing from the tank into the bowl.
3. What tools do I need to fix a running toilet?
- To fix a running toilet, you generally need basic tools like a wrench, a screwdriver, and possibly a pair of pliers. A replacement flapper or fill valve may also be required if the original parts are faulty.
4. How do I adjust the water level in the tank?
- The water level can be adjusted by bending the float arm or turning the adjustment screw on the fill valve. The water should be about an inch below the top of the overflow tube to ensure the toilet doesn’t run.
5. How long does it typically take to fix a running toilet?
- Most running toilet repairs can be completed in under an hour. The exact time depends on the cause of the problem and the ease of replacing or adjusting parts.
6. Do I need to turn off the water supply before fixing the toilet?
- Yes, it’s important to turn off the water supply to the toilet before starting any repairs to prevent water from flowing while you work on the parts.
7. How can I replace the flapper if it’s worn out?
- To replace the flapper, turn off the water supply, remove the old flapper by unhooking it from the flush valve, and attach the new flapper. Ensure the chain has the proper tension for a good seal.
8. What should I do if replacing the flapper doesn’t stop the running?
- If the flapper replacement doesn’t fix the issue, check the fill valve or float. If either is damaged or improperly adjusted, they may need replacement or adjustment.
9. When should I call a plumber for a running toilet?
- If the toilet continues running after you’ve tried adjusting or replacing the flapper and fill valve, or if you notice any leaks that are difficult to fix, it’s a good idea to call a plumber for assistance.
10. Can fixing a running toilet save money on water bills?
- Yes, fixing a running toilet can save a significant amount on water bills, as a constantly running toilet can waste hundreds of gallons of water daily.