Uncategorized

clogged bathtub drain
Uncategorized

Why Your Shower Won’t Drain Properly and How to Fix It

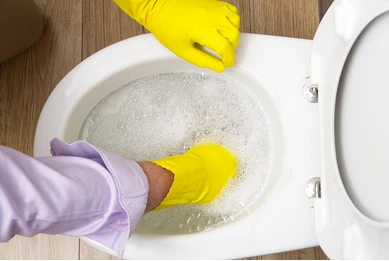
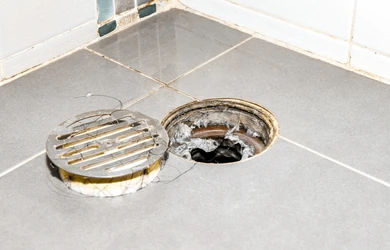
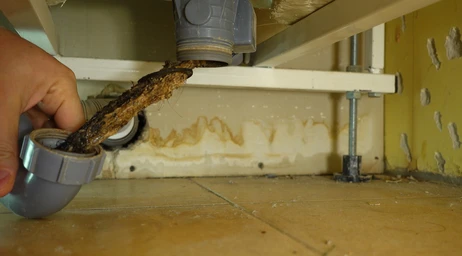
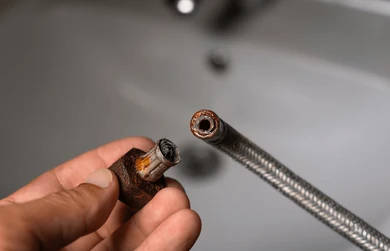
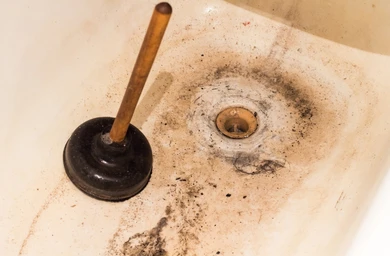
A slow-draining shower is a frustrating issue that can turn a refreshing shower experience into a stressful one. Over time, water begins to pool at your feet, and if left unchecked, this minor annoyance can evolve into a significant plumbing problem. Understanding the common causes of shower drainage issues and how to fix them can save you from more expensive repairs down the road. In this article, we’ll explore the reasons why your shower won’t drain properly and provide actionable steps to fix it. Common Causes of Shower Drain Blockages Shower drains are prone to clogs for several reasons. From the accumulation of hair and soap scum to mineral buildup and foreign objects, multiple factors can impede water flow. Below are some of the most common causes: 1. Hair Accumulation Hair is the number one culprit behind most shower drain clogs. As you wash your hair, strands inevitably fall out and are washed down the drain. Over time, these strands can collect in the drainpipe, gradually forming a blockage. This hairball can trap soap scum and other debris, exacerbating the clog. 2. Soap Scum Soap may seem harmless, but over time it can lead to drainage issues. Soap scum, created when soap combines with hard water, forms a sticky residue that clings to the sides of your pipes. When combined with hair, it can create stubborn clogs. 3. Mineral Buildup If you live in an area with hard water, mineral deposits may accumulate inside your pipes over time. This buildup can restrict the flow of water, causing slow drainage. Although this issue isn’t as common as hair or soap scum, it’s more challenging to fix without professional help. 4. Foreign Objects Sometimes, small objects like shampoo bottle caps, razors, or children’s bath toys accidentally fall into the shower drain. These objects can create an instant blockage and will often require removal by a professional plumber. 5. Tree Root Intrusion Though less common, tree roots can invade your plumbing system and obstruct drainage. This usually happens if there are cracks or small openings in your sewer line. Tree roots naturally grow toward water sources, and when they find an entry point, they can cause severe blockages. How to Fix a Slow-Draining Shower Now that we’ve covered the common causes of shower drain blockages, let’s discuss how to resolve the issue. Depending on the severity of the clog, you can try several different methods, ranging from DIY solutions to professional intervention. 1. Remove Hair Manually One of the simplest fixes is to remove the blockage manually. Hair is often the primary cause of slow drainage, and in many cases, it’s visible just below the drain cover. Step 1: Remove the drain cover. If the cover is screwed in, use a screwdriver. Step 2: Using a wire hanger, tweezers, or a drain snake, pull out as much hair and debris as possible. Step 3: After removing the hair, run hot water to check if the drain is clear. This method is often effective for small blockages that haven’t formed deep in the plumbing. 2. Use Boiling Water Boiling water can help dissolve soap scum and small clogs caused by hair or other debris. This method is particularly useful for clearing soap scum buildup. Step 1: Boil a large pot of water. Step 2: Carefully pour the boiling water down the drain in stages, allowing each pour to work through the clog before adding more. Be cautious with this method if you have PVC pipes, as boiling water can soften them over time. 3. Try a Plunger A plunger can be a surprisingly effective tool for clearing shower drain clogs. It works by creating suction that can dislodge the blockage. Step 1: Apply petroleum jelly around the rim of the plunger to create a better seal. Step 2: Fill the shower with enough water to cover the bottom of the plunger. Step 3: Place the plunger over the drain and push down firmly before pulling up in a quick motion. Repeat this process several times until the blockage clears. 4. Use a Drain Snake A drain snake, also known as an auger, is a tool designed to navigate through the pipes and break up or pull out clogs. Step 1: Insert the drain snake into the drain until you encounter resistance. Step 2: Rotate the handle of the snake to break up or snag the clog. Step 3: Once you feel the blockage clear, carefully pull the snake out, ensuring that any debris comes out with it. Drain snakes are highly effective for deeper clogs that manual removal tools can’t reach. 5. Use a Natural Drain Cleaner Chemical drain cleaners can be harsh on your pipes and harmful to the environment. Instead, consider using a natural drain cleaner made from ingredients you probably already have in your kitchen. Step 1: Pour half a cup of baking soda down the drain. Step 2: Follow with half a cup of white vinegar. You’ll notice fizzing as the two ingredients react. Step 3: Let the mixture sit for about 15 minutes, then flush with boiling water. This combination can dissolve clogs caused by hair and soap scum without damaging your pipes. 6. Call a Professional Plumber If none of these methods resolve the issue, or if you suspect that tree roots or mineral buildup are causing the problem, it’s time to call a professional plumber. A plumbing expert can use specialized tools, such as hydro jetting equipment, to clear the pipes effectively. Preventing Future Shower Drain Clogs Preventing clogs in your shower drain is much easier and more cost-effective than dealing with them after they’ve formed. Here are some simple tips to help you keep your drain flowing freely: Use a Drain Cover: A drain cover or hair catcher can prevent hair and other debris from entering the drain. Clean the Drain Regularly: Make it a habit to remove hair and debris from the drain after each shower. Regular cleaning can prevent buildup over time. Run

Uncategorized

The Benefits of Regular Plumbing Maintenance

Plumbing systems are the unsung heroes of any home. We rely on them for everything from clean drinking water to hot showers, yet they are often overlooked until a problem arises. Regular plumbing maintenance may not seem necessary when everything appears to be working fine, but in reality, it is one of the most cost-effective and proactive measures a homeowner can take. In this article, we’ll explore the key benefits of regular plumbing maintenance and why it’s essential for keeping your home in peak condition. 1. Early Detection of Problems One of the most significant benefits of regular plumbing maintenance is the ability to catch small problems before they become larger, more expensive issues. During a routine inspection, a professional plumber can detect minor leaks, worn-out pipes, or early signs of corrosion. These problems might not cause immediate concern, but if left untreated, they can lead to severe water damage, mold growth, and costly repairs. For instance, a small leak under the sink might seem like a minor inconvenience, but over time, it can cause extensive water damage to your cabinets and floors. Early detection through regular maintenance can help you avoid these issues and keep your plumbing system running smoothly. 2. Improved Water Quality The quality of water in your home is directly related to the health of your plumbing system. Pipes that are old, corroded, or clogged can affect the taste and safety of your water. Over time, minerals, rust, and other contaminants can accumulate inside your pipes, leading to poor water quality. Regular plumbing maintenance can include flushing your water heater, inspecting your water lines, and checking for any signs of corrosion. By keeping your plumbing system clean and well-maintained, you ensure that your water remains safe and healthy for your family to use. 3. Increased Lifespan of Plumbing Components Just like any other system in your home, plumbing components wear out over time. However, regular maintenance can significantly extend the lifespan of these components. Water heaters, faucets, and pipes all have a limited lifespan, but with proper care and attention, you can delay the need for replacements. For example, a water heater that undergoes regular maintenance, such as flushing to remove sediment buildup, can last several years longer than one that is neglected. Similarly, keeping your faucets and pipes in good condition through regular checkups can help prevent leaks and prolong their usability. 4. Prevention of Costly Emergencies Plumbing emergencies tend to happen at the most inconvenient times, and they can be expensive to fix. A burst pipe, a backed-up sewer line, or a malfunctioning water heater can result in extensive water damage and require immediate attention. These emergencies often result from problems that could have been prevented with regular maintenance. By scheduling regular inspections, homeowners can avoid these costly surprises. A professional plumber can identify potential hazards, such as weak pipes or clogs in the drainage system, and address them before they lead to an emergency. In the long run, regular maintenance can save you money and prevent the stress of dealing with unexpected plumbing disasters. 5. Energy Efficiency Many homeowners may not realize that their plumbing system plays a significant role in their home’s overall energy efficiency. A water heater that is not properly maintained, for instance, may have to work harder to heat water, leading to increased energy consumption and higher utility bills. Similarly, leaks in your plumbing system can cause water to run continuously, wasting both water and energy. Regular maintenance can ensure that your plumbing system is operating efficiently. A plumber can check your water heater’s thermostat, flush out sediment that reduces efficiency, and fix any leaks that might be contributing to wasted energy. By keeping your plumbing system in good condition, you can reduce your environmental footprint and lower your utility bills. 6. Ensures Proper Water Pressure Low water pressure can be frustrating, whether you’re trying to take a shower, wash dishes, or fill a pot of water. One common cause of low water pressure is a build-up of sediment and minerals in your pipes. Over time, this accumulation can reduce the diameter of your pipes, leading to decreased water flow. Regular plumbing maintenance can address this issue by identifying and cleaning any blockages in your system. A plumber can also check for leaks that may be reducing water pressure and ensure that your pipes are in good condition. By maintaining your plumbing system, you can enjoy consistent water pressure throughout your home. 7. Health and Safety Benefits Water damage is not just an inconvenience—it can also pose significant health risks. Mold and mildew thrive in moist environments, and a plumbing leak can create the perfect conditions for their growth. Mold exposure can cause respiratory problems, especially for individuals with asthma or allergies. Additionally, contaminated water due to corroded or damaged pipes can pose a health risk to your family. Regular plumbing maintenance can help prevent these issues by addressing leaks and ensuring that your water supply is safe and clean. By taking care of your plumbing system, you also protect your family’s health and safety. 8. Increases Home Value If you’re considering selling your home, the condition of your plumbing system can significantly impact its value. A well-maintained plumbing system is a strong selling point, as prospective buyers are likely to be wary of homes with outdated or poorly maintained plumbing. Regular maintenance can increase your home’s resale value by giving potential buyers confidence that the plumbing system is in good condition. Additionally, it can prevent issues that might arise during a home inspection, which could lead to costly repairs or renegotiations during the sale process. 9. Saves Money on Water Bills Leaks, drips, and inefficient plumbing fixtures can waste a significant amount of water, leading to higher utility bills. A single leaky faucet, for instance, can waste gallons of water each day. Over time, these small leaks can add up to a substantial increase in your water bill. By addressing these issues through regular maintenance, you can

Common Faucet Leaks
Uncategorized

How to Fix a Sputtering Faucet in 3 Easy Steps

Your home’s plumbing system is often overlooked until an issue arises. However, hidden plumbing problems can cause extensive damage if not addressed in time. While regular maintenance is key, some issues remain undetected and gradually worsen, potentially leading to costly repairs. In this article, we’ll explore five hidden plumbing problems that can ruin your home if ignored. 1. Leaky Pipes Behind Walls One of the most common hidden plumbing issues is leaky pipes behind walls. These leaks often go unnoticed for long periods, allowing water to seep into your walls and cause severe structural damage. This problem can lead to: Mold Growth: Excess moisture creates an ideal environment for mold, which can spread rapidly. Mold not only damages your walls and ceilings but also poses health risks to your family, especially for those with respiratory issues. Water Damage: Prolonged exposure to water weakens your walls, leading to cracks, peeling paint, and eventually, the need for expensive repairs. In extreme cases, it can compromise the structural integrity of your home. Increased Water Bills: Even a small leak can lead to a significant increase in your water bill over time. If you notice an unexplained rise in your utility bills, a hidden leak could be the culprit. How to Prevent It: Regularly inspect your home for signs of water damage, such as water stains or damp spots. If you suspect a leak, contact a professional plumber for an inspection. Utilizing modern leak detection technology can help pinpoint hidden leaks without tearing down your walls. 2. Clogged Sewer Lines Sewer lines are essential for disposing of wastewater from your home. A clogged sewer line can cause wastewater to back up into your drains, sinks, or toilets, creating a health hazard and causing unpleasant odors. The most common causes of sewer line blockages include: Tree Roots: Tree roots can infiltrate sewer lines, causing blockages and even pipe damage. Over time, roots grow deeper into the pipes, leading to costly repairs. Flushing Non-Flushable Items: Items like paper towels, wipes, and feminine hygiene products can create significant blockages in your sewer line. How to Prevent It: Avoid flushing non-flushable items and be mindful of what goes down your drains. Regular sewer line inspections by a plumbing professional, especially if you live in an older home, can help catch potential issues before they escalate. 3. Faulty Water Heaters Water heaters are critical for providing hot water to your home. However, when they start to fail, it can lead to serious problems such as: Water Damage: A leaking water heater can flood your home, damaging floors, walls, and personal belongings. This is especially dangerous if the leak occurs in an area that’s not frequently inspected, such as a basement or closet. Sediment Build-Up: Over time, minerals from hard water can build up in your water heater, reducing its efficiency and shortening its lifespan. This can also cause strange noises, like popping or banging, indicating that the heater is struggling to function properly. How to Prevent It: To avoid a sudden breakdown or leaks, it’s essential to have your water heater inspected annually by a professional. Flushing your water heater regularly helps remove sediment build-up and extend its lifespan. 4. Hidden Slab Leaks A slab leak occurs when the pipes beneath your home’s foundation start leaking. These leaks can go undetected for months or even years, causing significant damage to your home’s foundation. Common signs of a slab leak include: Damp or Warm Floors: If you notice unexpected dampness or warmth on your floors, it could be a sign of a slab leak. This is especially noticeable in rooms that do not have plumbing fixtures nearby. Cracks in Walls or Flooring: As the leak erodes the soil beneath your foundation, it can cause your foundation to shift, leading to cracks in your walls, floors, or ceilings. Low Water Pressure: Slab leaks can cause a drop in water pressure throughout your home, making it harder to perform everyday tasks like washing dishes or taking a shower. How to Prevent It: While slab leaks can be difficult to detect, regular inspections by a licensed plumber can identify early warning signs. If your home is older, consider upgrading your plumbing system to prevent future leaks. 5. Corroded Pipes Over time, pipes can corrode due to the natural wear and tear of your plumbing system. This is especially true if your home has older, galvanized steel pipes. Corrosion can cause: Water Discoloration: If your water takes on a rusty or brownish hue, your pipes are likely corroding. This can also affect the taste and smell of your water. Frequent Leaks: Corroded pipes are more prone to leaks, which can cause significant water damage if left unchecked. Low Water Pressure: Corrosion can reduce the diameter of your pipes, leading to a noticeable decrease in water pressure. How to Prevent It: If your home has older pipes, consider having them inspected and replaced with modern materials such as copper or PEX. These materials are more resistant to corrosion and can help extend the life of your plumbing system. Why Regular Maintenance Matters The key to avoiding hidden plumbing problems is regular maintenance and timely inspections. By addressing minor issues before they become major disasters, you can save yourself from costly repairs and keep your home in good condition. In Plano, TX, Chrome Heating Air Conditioning offers comprehensive plumbing services to help you maintain a healthy, efficient system. From detecting hidden leaks to upgrading old pipes, their team of experts can ensure your plumbing is running smoothly. Conclusion Hidden plumbing problems can wreak havoc on your home if left undetected. Leaky pipes, clogged sewer lines, faulty water heaters, slab leaks, and corroded pipes are just a few of the issues that can cause significant damage. The best way to protect your home is by scheduling regular inspections and maintenance with a trusted plumbing service like Chrome Heating Air Conditioning. By staying proactive, you can prevent small plumbing issues from turning into costly disasters and enjoy

Brust Pipe Repair
Uncategorized

Common Causes of Burst Pipes and How to Prevent Them

A burst pipe can cause significant damage to a home or business, leading to costly repairs and water damage. Understanding the common causes of burst pipes and how to prevent them is essential for maintaining the health of your plumbing system and avoiding unexpected disasters. In this article, we’ll explore the key factors contributing to burst pipes and provide practical prevention tips to keep your home safe. What Causes Pipes to Burst? Burst pipes can occur for various reasons, from weather conditions to plumbing issues. Below are some of the most common causes of burst pipes. 1. Freezing Temperatures One of the leading causes of burst pipes, especially in colder regions, is freezing temperatures. When the temperature drops below freezing, the water inside your pipes can freeze. As the water freezes, it expands, exerting pressure on the walls of the pipe. Over time, this pressure can cause the pipe to crack or burst. This issue can happen in uninsulated or exposed pipes, especially those located in attics, basements, or exterior walls. Even homes in relatively warmer areas like Plano, TX, can experience freezing temperatures during the winter, making it a potential risk for burst pipes. 2. Corrosion and Age As plumbing systems age, pipes can become corroded or weakened. Metal pipes, particularly those made from steel or iron, are especially susceptible to corrosion. Over time, rust and corrosion can eat away at the pipe’s walls, making them more vulnerable to bursting under pressure. Older homes with aging plumbing systems are more likely to experience burst pipes due to the degradation of materials. Corrosion may also occur if the water has a high mineral content or is acidic, contributing to the breakdown of pipes over time. 3. High Water Pressure Water pressure that is too high can put stress on your plumbing system. Pipes are designed to handle a certain amount of pressure, and if the water pressure exceeds this limit, it can weaken the pipes and cause them to burst. In homes with inconsistent or unusually high water pressure, it’s essential to regulate the pressure to avoid overburdening the pipes. The pressure should ideally be between 40 and 60 pounds per square inch (psi). Anything over 60 psi can create stress on your pipes, leading to potential failure. 4. Clogs and Blockages Clogs in your plumbing system can also lead to burst pipes. When a pipe becomes blocked, water pressure builds up behind the clog, especially if it’s located in a narrow section of the pipe. The increased pressure can cause the pipe to rupture, leading to leaks or full-blown bursts. Common causes of blockages include grease, hair, food particles, and debris that build up over time. Additionally, tree roots growing into underground pipes can block water flow, causing the pipe to burst. 5. Shifting or Settling Soil Ground movement can put significant strain on your pipes, causing them to crack or break. Shifting soil can result from natural events such as earthquakes, landslides, or construction work nearby. This issue is more prevalent in areas where soil conditions change with moisture levels, leading to settling or shifting. Over time, as the soil moves, it can exert pressure on underground pipes, causing them to burst. This is a common problem for homes with aging infrastructure or pipes buried in unstable ground. 6. Improper Installation or Poor Workmanship Improper installation or substandard workmanship can also lead to burst pipes. If pipes are not installed correctly, they may be more prone to stress, wear, and leaks. Poorly secured pipes can vibrate and shift over time, weakening connections and increasing the risk of a rupture. This problem can be prevented by hiring licensed professionals to install and maintain your plumbing system. Ensuring that pipes are properly insulated, supported, and securely connected will help avoid issues down the line. 7. Sudden Temperature Changes Pipes can also burst when there is a sudden, extreme temperature fluctuation. Rapid heating and cooling can cause materials to expand and contract, putting stress on pipes. This can happen, for example, if a cold snap is followed by a sudden thaw. In regions where temperatures fluctuate, like Plano, TX, it’s essential to prepare your plumbing system for seasonal changes to prevent this issue. How to Prevent Burst Pipes Preventing burst pipes requires proactive maintenance and attention to your plumbing system. Here are some key strategies to help protect your home from this costly problem: 1. Insulate Pipes in Vulnerable Areas Properly insulating pipes in areas prone to freezing is one of the most effective ways to prevent burst pipes. Use pipe insulation, especially on pipes located in unheated areas like basements, attics, and crawl spaces. Insulating materials help keep the pipes warm and prevent the water inside from freezing. In addition to pipe insulation, you can use heating cables or tape for pipes that are more exposed to the elements. 2. Keep the Heat On During cold weather, keep your home’s heating system on, even when you’re away. Maintaining a steady temperature, especially in areas where pipes are located, helps prevent freezing. Ideally, keep your thermostat set to at least 55°F, even if you’re on vacation. This small step can make a significant difference in preventing frozen pipes and the costly damage that comes with burst pipes. 3. Maintain Water Pressure Regularly monitor your home’s water pressure to ensure it stays within a safe range. Installing a pressure regulator can help manage and stabilize water pressure in your plumbing system. If you suspect your water pressure is too high, contact a professional to assess and adjust it accordingly. This is especially important if you notice fluctuations in water pressure, which can indicate underlying issues that need attention. 4. Check for Leaks and Corrosion Regularly inspect your plumbing system for signs of leaks, rust, or corrosion. If you notice any discoloration, damp spots, or unusual odors, it may be a sign of a leak or corroded pipes. Catching these issues early can prevent further damage and potential bursts. You should also

Uncategorized

How to Handle an Overflowing Toilet Without Panic

Dealing with an overflowing toilet can be an unsettling experience. It’s one of those household emergencies that catches many homeowners off-guard, causing panic and stress. However, the situation doesn’t have to spiral out of control if you follow a step-by-step approach to resolve the issue calmly. In this guide, we will explain how to handle an overflowing toilet with confidence, making sure you minimize damage and restore order swiftly. 1. Understand the Cause of the Overflow The first step in managing an overflowing toilet is understanding why it’s happening. An overflow occurs when water fills the bowl and can’t drain properly. This is usually caused by a blockage in the plumbing system, which prevents water from passing through the pipes as it should. The most common causes include: Clogged Pipes: Items like excessive toilet paper, sanitary products, wipes, or foreign objects can get stuck in the pipes, obstructing the flow. Faulty Float Mechanism: If the toilet’s float mechanism (inside the tank) malfunctions, the tank may continue to fill with water, leading to overflow. Sewer Line Issues: In more severe cases, the sewer line might be blocked, causing backups that lead to toilet overflow. Knowing what caused the overflow is helpful because it informs how to approach the fix. If it’s a simple clog, you might be able to resolve it yourself. But if it’s a more serious problem, like a sewer line blockage, you’ll need professional help. 2. Turn Off the Water Supply When you notice that your toilet is overflowing, the first thing to do is stop the water from flowing into the bowl. Look behind or around your toilet for a shutoff valve. This valve, often located on the wall, can be turned clockwise to cut off the water supply immediately. If the shutoff valve is stuck or hard to turn, you can remove the lid of the toilet tank and manually stop the water flow. To do this: Lift the float (the ball or cup-shaped device) upward. This action should stop the water from filling the tank. Alternatively, reach down to the flapper (the rubber or plastic component at the bottom of the tank) and close it. This stops water from flowing into the bowl. Once the water supply is shut off, you can begin assessing the situation without worrying about additional overflow. 3. Plunge the Toilet Carefully If the overflow is due to a clog, your next move is to use a plunger. Make sure you have a good-quality plunger with a flange at the bottom that creates a tight seal in the toilet bowl. Here’s how to plunge effectively: Position the Plunger: Place the plunger directly over the hole at the bottom of the toilet bowl, ensuring it creates a tight seal. Push and Pull: Start by pushing down gently. If you push too forcefully, you might splash water. Once you establish a seal, plunge with more vigor, using both downward and upward strokes. Keep Plunging: Continue plunging for about 20-30 seconds. You may need to repeat this process a few times before the clog dislodges. Once the water begins to drain and the clog clears, flush the toilet to check if it operates normally. If the toilet still overflows or doesn’t drain properly, it may be time to call a professional plumber. 4. Clean Up the Overflowing Water After you’ve resolved the clog, it’s time to deal with the mess. Toilet overflow water can be unsanitary, so it’s essential to clean it up quickly to prevent damage and maintain hygiene. Follow these steps: Wear Protective Gear: Before cleaning up, wear rubber gloves to protect your hands. If the overflow is extensive, you might also want to wear boots and use towels or paper towels to create a barrier between the water and your floor. Soak Up the Water: Use towels, mops, or a wet-dry vacuum to soak up the water. Remove as much water as possible to prevent damage to your flooring. Disinfect the Area: After the water is removed, disinfect the area with a mixture of water and bleach (1:10 ratio) to eliminate bacteria and prevent contamination. Ventilate: Open windows and use fans to dry the space quickly. This will prevent mold and mildew from developing. 5. Prevent Future Overflows Once the immediate problem is under control, it’s essential to take preventive measures to ensure this doesn’t happen again. Here are some tips to keep your toilet functioning properly: Be Mindful of What You Flush: Only flush toilet paper and human waste. Avoid flushing sanitary products, wipes, or any foreign objects. Regular Maintenance: Schedule regular inspections and maintenance for your plumbing system. Chrome Heating Air Conditioning in Plano, TX, offers comprehensive plumbing services, including drain cleaning, to help prevent blockages. Upgrade Your Toilet: If your toilet is older, consider upgrading to a newer, more efficient model. Modern toilets use less water and are less prone to overflows caused by faulty mechanisms. 6. Know When to Call a Professional While many toilet overflows can be managed with quick thinking and the right tools, there are times when calling a professional is the best course of action. Here are a few situations where you should seek expert help: Persistent Clogs: If the toilet keeps clogging despite your best efforts, it could be a sign of a more significant problem, such as an issue with your sewer line. Slow Draining: If your toilet drains slowly, even after plunging, it may indicate a partial blockage that requires professional equipment to remove. Sewer Line Blockages: If you suspect a sewer line blockage, such as when multiple drains in your home are affected, you’ll need the expertise of a plumber to diagnose and fix the problem. For residents in the Plano, TX area, Chrome Heating Air Conditioning provides reliable plumbing services that can resolve even the most challenging overflow issues. Their team of professionals is equipped with the latest tools to diagnose and fix any plumbing issue, ensuring your toilet works correctly. 7. What to Expect From a

Uncategorized

Why You Should Never Pour Grease Down the Drain

As convenient as it may seem to dispose of cooking grease by pouring it down the drain, this habit can lead to severe plumbing problems and environmental consequences. Grease might appear to flow smoothly down the pipes, but it has a nasty habit of solidifying as it cools, creating blockages and costly repairs down the road. In this article, we’ll explore why you should never pour grease down the drain and how you can manage grease disposal properly. The Plumbing Dangers of Grease Disposal The plumbing system in your home is designed to handle water and some small particles, but it’s not equipped to manage fats, oils, and grease (FOG). Here are a few ways in which pouring grease down the drain can create serious plumbing issues. 1. Blockages in Pipes When hot grease is poured into a drain, it cools as it moves through the plumbing system. As it cools, the grease solidifies, sticking to the sides of the pipes. Over time, these small deposits build-up, reducing the diameter of the pipes and eventually causing a full blockage. This can lead to slow drainage, backups, and even burst pipes. 2. Clogs in the Sewer System The problems don’t stop with your home’s plumbing. Grease that makes its way into the municipal sewer system can contribute to large-scale clogs. These clogs, often referred to as “fatbergs,” are massive accumulations of grease, oils, and non-biodegradable waste that block sewers. Fatbergs can cause sewer overflows, leading to public health risks and expensive municipal repairs. 3. Damage to Garbage Disposals Some people believe that running grease through the garbage disposal will break it up enough to prevent problems, but this is a misconception. Garbage disposals are not designed to handle fats and oils, and the spinning blades do little to prevent grease from coating your pipes. Over time, the grease can cause your garbage disposal to malfunction or require replacement. 4. Costly Plumbing Repairs Dealing with the aftermath of grease clogs is not only inconvenient but also costly. The blockages caused by grease can require professional intervention, and in severe cases, entire sections of the pipe may need to be replaced. Regular service calls from professionals like Chrome Heating Air Conditioning in Plano, TX, could be necessary to clear out grease buildup and ensure your plumbing system functions properly. Environmental Impacts of Pouring Grease Down the Drain In addition to the damage caused to your plumbing and the sewer system, improper grease disposal has significant environmental consequences. 1. Water Contamination When grease enters the sewer system, it can make its way into water treatment facilities, where it poses a challenge for water purification. Not all grease can be filtered out, which means some of it ends up in local water sources. This can harm aquatic ecosystems and contribute to the pollution of rivers, lakes, and oceans. 2. Overburdening Wastewater Treatment Plants Grease that reaches wastewater treatment plants can slow down the treatment process. This forces the plants to work harder to purify the water before it’s returned to the environment. In extreme cases, excessive grease buildup can cause treatment plant malfunctions, resulting in untreated or partially treated wastewater being released into the environment. 3. Impact on Wildlife When water contaminated with grease and oils is released into the environment, it can have devastating effects on wildlife. Animals that come into contact with grease-contaminated water may suffer health issues, and plants and ecosystems can be irreversibly damaged. Best Practices for Grease Disposal Fortunately, there are many safe ways to dispose of grease that won’t harm your plumbing or the environment. These simple steps can prevent clogs and save you from expensive repairs. 1. Let Grease Solidify One of the easiest ways to dispose of grease is to let it solidify. After cooking, allow the grease to cool and harden. Once solid, scrape it into a container or wrap it in paper towels and throw it in the trash. This prevents the grease from entering your plumbing system in the first place. 2. Use a Grease Container To make grease disposal easier, keep a designated grease container near your stove. Once the container is full, simply dispose of it in the trash. Many people use empty cans or jars for this purpose. You can even find containers specifically designed for grease storage at kitchen supply stores. 3. Wipe Down Dishes Before Washing After cooking with grease, use a paper towel to wipe down pans, plates, and utensils before washing them in the sink. This removes the majority of the grease and ensures it doesn’t enter your drain. While it’s impossible to remove all traces of grease from your dishes, this practice can significantly reduce the risk of blockages. 4. Recycle Used Cooking Oils In some areas, there are programs for recycling used cooking oil. Instead of pouring oil down the drain, store it in a container and take it to a recycling center. These centers often turn the oil into biofuel or other environmentally friendly products. The Role of Professional Plumbing Services Despite your best efforts to dispose of grease properly, small amounts may still enter your plumbing system over time. This is why it’s essential to have your plumbing inspected and cleaned regularly by professionals. Plumbing experts, such as those at Chrome Heating Air Conditioning in Plano, TX, have the tools and experience to clear out any grease buildup before it becomes a significant issue. 1. Regular Drain Cleaning Scheduling regular drain cleaning services can help remove any small amounts of grease and other debris that have accumulated in your pipes. Professionals use specialized equipment to clear out clogs and ensure that your plumbing is functioning efficiently. 2. Sewer Line Inspections In addition to cleaning your drains, it’s a good idea to have your sewer line inspected periodically. Using cameras and other advanced technology, plumbing professionals can identify potential problems before they escalate, helping you avoid costly repairs and sewer backups. Grease and Your Septic System If your home relies on a septic

Uncategorized

How to Properly Insulate Your Pipes for Winter

As winter approaches, homeowners must prioritize protecting their property from the potential damage caused by freezing temperatures. One critical aspect of winterizing your home is ensuring that your pipes are adequately insulated. Frozen pipes can lead to burst pipes, water damage, and costly repairs. Fortunately, with the right techniques and materials, insulating your pipes can be a simple and effective way to prevent these problems. In this guide, we’ll walk you through everything you need to know about how to properly insulate your pipes for winter. We will also discuss some essential tips that professionals like Chrome Heating Air Conditioning in Plano, TX, recommend to keep your plumbing safe and functional throughout the colder months. Why Insulating Your Pipes is Important The main reason to insulate your pipes during the winter is to prevent them from freezing. When water freezes inside pipes, it expands, creating pressure that can cause the pipe to crack or burst. This can lead to extensive water damage, costly repairs, and the inconvenience of being without running water. Additionally, insulated pipes can help improve the overall energy efficiency of your home by reducing heat loss from hot water pipes, saving you money on energy bills. Proper insulation is essential, especially in areas like attics, crawl spaces, and exterior walls where pipes are more exposed to cold air. Materials You’ll Need for Pipe Insulation Before you begin, gather the necessary materials to ensure the job is done correctly. Here are some of the most common materials for insulating pipes: Pipe Insulation Foam Tubes: These are pre-slit foam tubes that wrap around the pipes. They come in various sizes to fit different pipe diameters and are easy to install. Foam insulation is a popular choice for its affordability and effectiveness. Pipe Wrap Insulation: This type of insulation consists of a flexible material like fiberglass or foam that you wrap around the pipes. It’s ideal for pipes with irregular shapes or in areas where foam tubes are difficult to install. Heat Tape: Heat tape is an electric cable that wraps around pipes to provide warmth and prevent freezing. It’s especially useful for outdoor pipes or pipes that are exposed to extremely cold temperatures. Duct Tape: Duct tape is used to secure insulation materials in place and seal any gaps. Pipe Insulation Tape: This adhesive-backed tape is specifically designed to wrap around pipes and is easy to apply in tight spaces or on complex pipework. Gloves and Safety Gear: Insulating materials like fiberglass can irritate the skin, so wearing gloves and other protective gear is important while working. Step-by-Step Guide to Insulating Your Pipes Step 1: Identify the Pipes That Need Insulation The first step is identifying which pipes in your home are at the highest risk of freezing. Generally, you should focus on pipes located in unheated or poorly insulated areas, such as: Attics Basements Crawl spaces Garages Exterior walls Outdoor faucets and hose bibs These areas are more susceptible to cold air and require proper insulation to prevent freezing. Step 2: Measure the Pipes Once you’ve identified the pipes, measure their length and diameter to determine how much insulation you’ll need. Insulation foam tubes and wraps come in various sizes, so it’s essential to get the right size to ensure a snug fit. Most home improvement stores carry insulation materials based on pipe diameters. Step 3: Clean the Pipes Before applying insulation, clean the pipes to remove any dirt, dust, or moisture. This will help the insulation adhere better and create a more effective barrier against cold temperatures. Step 4: Install the Insulation Now it’s time to install the insulation. Follow these steps for each type of material: Foam Tubes: Simply open the pre-slit foam tube and place it around the pipe. Make sure the insulation fits snugly around the pipe with no gaps. Use duct tape to seal the seams and secure the insulation in place. Cut the foam to size if necessary. Pipe Wrap Insulation: Wrap the insulation material tightly around the pipe, overlapping each layer to avoid any exposed sections. Use duct tape to secure the ends and ensure the wrap stays in place. Heat Tape: Follow the manufacturer’s instructions for wrapping heat tape around the pipes. Be sure to plug it into a grounded outlet if it requires electricity. Heat tape is highly effective for exposed pipes and can help prevent freezing in extreme conditions. Step 5: Seal Any Gaps or Joints After installing the insulation, inspect the entire length of the pipe to ensure there are no gaps or exposed sections. Pay close attention to bends, joints, and valves. Use pipe insulation tape or additional foam pieces to cover any areas that need extra protection. This step is crucial to ensure there are no weak points where cold air can penetrate. Step 6: Insulate Outdoor Faucets and Hose Bibs Outdoor faucets are particularly vulnerable to freezing and should be insulated or turned off for the winter. Use foam faucet covers to protect them from the cold. If possible, shut off the water supply to outdoor faucets and drain the lines to prevent any remaining water from freezing. Additional Tips for Winter Pipe Protection Beyond insulating your pipes, here are a few more tips to protect your plumbing during the winter months: Let Faucets Drip: During extremely cold weather, letting your faucets drip slightly can relieve pressure in the pipes and reduce the risk of freezing. Open Cabinet Doors: In areas like kitchens and bathrooms, open the cabinet doors under sinks to allow warm air from your home to circulate around the pipes. Seal Gaps and Cracks: Check for gaps or cracks in your home’s walls, floors, and foundation where cold air can enter. Use caulk or foam sealant to fill any holes, especially around pipes that penetrate exterior walls. Keep Your Home Warm: Maintain a consistent temperature in your home, even when you’re away. Keeping the thermostat set at 55°F or higher can help prevent pipes from freezing. Drain Water Systems When

Uncategorized

How to Save Money on Your Water Bill with Simple Repairs

Water bills are an essential yet sometimes frustrating part of home maintenance. Many homeowners are shocked that their water consumption is higher than expected, often due to minor leaks or inefficient plumbing systems. Fortunately, there arnd cost-effective repairs that can reduce water usage, lower your bill, and benefit the environment. This guide will walk you through some of the most effective ways to save money on your water bill with easy repairs, with services provided by Chrome HeatingAir Conditioning inPlano, TX. 1services . Fix Leaky Faucets and Showerheads A single leaky faucet can waste gallons of water every day, and over time, this adds up to a significant increase in your water bill. Fixing a leaky faucet is one of the simplest repairs you can do yourself, and it requires only a few basic tools. Here’s how: Turn off the water supply: Before you start, make sure to shut off the water supply to the faucet to avoid further leakage. Disassemble the faucet: Use a wrench or pliers to carefully remove the faucet handle. Once removed, inspect the washer or O-ring inside the faucet, as these are the most common causes of leaks. Replace worn parts: If you notice any signs of wear or damage, replace the washer or O-ring. These parts are inexpensive and can be found at any hardware store. Reassemble and test: Once you’ve replaced the necessary parts, reassemble the faucet, turn the water back on, and check for any leaks. For leaky showerheads, the process is similarly straightforward. Tighten any loose connections or replace the washer inside the showerhead to stop the leak. By fixing these small leaks, you could save up to 10% on your water bill, according to the EPA. 2. Replace Worn-Out Toilet Flappers Toilets are one of the most water-intensive fixtures in any home. If your toilet runs constantly or doesn’t stop refilling after a flush, you may have a faulty flapper. The flapper is the rubber valve that controls water flow from the tank to the bowl. Over time, flappers can wear out and cause your toilet to wastewater. How to Replace a Toilet Flapper: Turn off the water supply: As with faucets, start by shutting off the water supply to your toilet. Remove the old flapper: Open the tank lid and locate the flapper at the bottom. Unhook it from the chain and lift it out of the tank. Install a new flapper: Replace the old flapper with a new one, making sure it fits snugly. You can find a replacement flapper at most hardware stores for less than $10. Test your toilet: Turn the water back on and test the toilet to ensure that the new flapper is functioning properly. This quick fix can prevent your toilet from wasting hundreds of gallons of water each year, significantly reducing your water bill. 3. Install Low-Flow Fixtures One of the most effective ways to save water is by installing low-flow fixtures. Low-flow faucets, showerheads, and toilets use significantly less water than older models without sacrificing performance. Here’s what you can do: Low-flow showerheads: A standard showerhead uses about 2.5 gallons of water per minute, but a low-flow model can reduce that to just 1.5 gallons per minute. This small change can save you thousands of gallons of water each year. Low-flow faucets: Similarly, installing a low-flow faucet in your kitchen or bathroom can reduce water usage by up to 30%. Look for faucets with the WaterSense label, which indicates that they meet EPA standards for water efficiency. Dual-flush toilets: If you’re considering replacing your toilet, opt for a dual-flush model. These toilets offer two flush options: a low-water flush for liquid waste and a higher-water flush for solid waste. This can save a significant amount of water, as most toilets use far more water than necessary for each flush. These low-flow fixtures are easy to install and will pay for themselves in the form of lower water bills over time. 4. Check for Hidden Leaks Not all leaks are easy to spot. Some may be hidden in your walls, floors, or underground pipes. One way to check for hidden leaks is to monitor your water meter. Here’s a simple process to follow: Turn off all water: Make sure no water is being used inside or outside your home (this includes appliances like washing machines and dishwashers). Check the water meter: Take note of the current reading on your water meter. Wait for 30 minutes to an hour and check the meter again. If the reading has changed, you likely have a hidden leak. Locate and fix the leak: If you suspect a hidden leak, it’s best to call a professional plumber to locate and repair it. Fixing these leaks can prevent major water damage and further reduce your water bill. 5. Upgrade to Efficient Appliances Water-efficient appliances can have a huge impact on your water consumption. Here are a few appliances to consider upgrading: Dishwashers: Newer models use significantly less water than older ones. An Energy Star-certified dishwasher uses about 4 gallons of water per cycle, compared to older models that can use up to 10 gallons. Washing machines: High-efficiency washing machines use less water and energy. Front-loading washers are particularly efficient, using as little as 15 gallons of water per load, compared to 30 or more gallons used by traditional top-loading models. Upgrading to these appliances may require an initial investment, but the long-term savings on your water bill will make it worthwhile. 6. Maintain Your Water Heater Your water heater plays a significant role in your water bill, as it controls the temperature of the water used throughout your home. Proper maintenance can help reduce your water and energy consumption: Check the temperature: Set your water heater to 120 degrees Fahrenheit. This is hot enough for everyday use but not so high that it wastes energy. Flush the tank: Over time, sediment can build up in your water heater, reducing its efficiency. Flushing the tank once a year

Uncategorized

Why Your Drain Keeps Clogging and How to Stop It

Clogged drains are a frustrating and common problem faced by many homeowners. A slow-draining sink, a backed-up shower, or standing water in your tub are signs that your drains are not working as they should. While it may seem like an isolated incident, recurring clogs often point to a deeper issue that needs attention. Fortunately, understanding why your drain keeps clogging can help you take steps to prevent it from happening again. Common Causes of Clogged Drains Several factors can lead to clogged drains. Understanding these causes is the first step in preventing future blockages. 1. Hair Accumulation Hair is one of the most common culprits behind clogged drains, especially in bathrooms. When hair strands mix with soap and other debris, they form a dense, tangled mass that can obstruct water flow. Over time, even small amounts of hair can accumulate and lead to significant clogs in shower and sink drains. 2. Grease and Food Waste In kitchens, grease and food waste are often the main contributors to clogged drains. While it might seem convenient to rinse food particles and oils down the drain, these materials don’t easily dissolve in water. Grease, in particular, solidifies as it cools, sticking to the sides of your pipes. As more waste passes through, it binds to the grease, eventually causing a blockage. 3. Soap Scum Soap scum is a less obvious but equally problematic cause of clogged drains. Traditional soaps contain oils and fats that don’t dissolve completely in water. These residues accumulate in pipes, mixing with hair, dirt, and other debris to form a stubborn clog. Over time, soap scum can build up in both bathroom and kitchen drains, reducing water flow. 4. Foreign Objects From cotton swabs to children’s toys, foreign objects often find their way into drains. These items can easily become lodged in the pipes, leading to a blockage that is difficult to clear without professional assistance. Common offenders include paper towels, feminine hygiene products, and wipes that are marketed as “flushable” but do not break down like toilet paper. 5. Tree Roots In some cases, the problem lies outside your home. Tree roots are notorious for seeking out water sources, and if they find a crack in your sewer line, they can infiltrate your pipes. As the roots grow, they cause blockages that prevent water from flowing freely through your drains. This issue is more common in older homes with mature trees in the yard. 6. Misaligned Pipes Drain clogs can also be caused by pipe issues, such as misalignment or sagging. If your pipes were not installed correctly or have shifted over time, it can create areas where waste accumulates, leading to blockages. Misaligned pipes can also trap debris, making it more difficult for water to flow freely. How to Stop Your Drains from Clogging Once you understand the root cause of your clogged drains, it becomes easier to take proactive measures to prevent future blockages. Here are some tips to keep your drains flowing smoothly. 1. Install Drain Covers One of the simplest yet most effective ways to prevent clogs is by using drain covers. These devices catch hair, food particles, and other debris before they can enter your pipes. Drain covers are inexpensive and easy to install in sinks, showers, and tubs. Regularly cleaning the covers will ensure they continue to function effectively. 2. Dispose of Grease Properly Never pour grease or oil down the drain. Instead, allow the grease to cool and solidify in a container, then dispose of it in the trash. If you accidentally pour grease down the drain, flush it with hot water and a small amount of dish soap to help break up the grease before it hardens. For regular maintenance, consider pouring boiling water down your kitchen sink once a week to help dissolve any accumulated grease or oil. 3. Clean Drains Regularly Regular cleaning can help prevent clogs from forming. For bathroom drains, use a mixture of baking soda and vinegar once a month to break down soap scum and other debris. For kitchen drains, flushing them with hot water and a bit of dish soap can help keep them clear. If you notice your drain is slowing down, address the issue early before it becomes a full-blown clog. 4. Watch What You Flush Be mindful of what goes down your toilet and drains. Only flush toilet paper, which is designed to break down easily in water. Avoid flushing items like wipes, sanitary products, and cotton balls, as they do not dissolve and can quickly cause a clog. For your sinks, avoid rinsing large food particles, coffee grounds, and fibrous vegetables down the drain. 5. Regular Inspections Schedule regular drain inspections, especially if you have experienced recurring clogs. A professional plumber can use specialized tools to inspect the inside of your pipes and identify potential problems before they worsen. Regular inspections can help you catch issues like tree root infiltration or misaligned pipes early, saving you from costly repairs down the line. 6. Be Aware of Landscaping If your home is older and has large trees in the yard, be mindful of where their roots might extend. Regular inspections of your sewer lines can help detect early signs of tree root infiltration. Additionally, planting trees and shrubs away from your main sewer line can reduce the risk of root intrusion. When to Call a Professional While many minor clogs can be addressed with DIY methods, there are times when you’ll need to call in a professional plumber, such as Chrome Heating Air Conditioning, located in Plano, TX. If you’ve tried using a plunger, drain cleaner, or a snake without success, it’s best to get expert help. Persistent clogs may indicate a more serious issue with your pipes that requires professional tools and expertise to resolve. Signs that you need professional drain cleaning services include: Recurring clogs in the same drain Multiple drains clogging at once Foul odors coming from the drain Slow drainage despite using DIY methods

full pipe replacement
Uncategorized

Is It Time for a Full Pipe Replacement?

The plumbing system is the backbone of any home, responsible for ensuring clean water reaches your faucets and that waste is efficiently carried away. Over time, even the most well-maintained plumbing systems can show signs of aging, which can leave homeowners facing the critical question: Is it time for a full pipe replacement? Warning Signs Your Pipes Need Attention While some plumbing issues can be addressed with quick fixes or repairs, others may indicate it’s time for a more comprehensive solution. Here are a few key signs that could point toward the need for a full pipe replacement: Frequent Leaks Occasional leaks in your plumbing are inevitable, but if you’re constantly repairing leaks, it may signal a larger underlying issue. Frequent leaks often suggest that your pipes are deteriorating, whether from corrosion, rust, or general wear and tear. If your home’s plumbing requires continuous patch-ups, the more cost-effective and long-term solution could be to replace the entire system. Discolored Water If you notice brown, yellow, or rust-colored water coming from your faucets, it could indicate that your pipes are corroding. Over time, the inner walls of metal pipes can rust, and this corrosion may eventually lead to contamination of your water supply. When water discoloration becomes a frequent occurrence, it’s a sign that replacing your pipes should be on the table. Low Water Pressure Low water pressure can be caused by various issues, including clogs, leaks, or damaged pipes. While temporary clogs can be easily addressed, low water pressure that persists could mean that your pipes are narrowing due to corrosion or mineral buildup. In this case, a full pipe replacement may be the best solution to restore your plumbing system’s functionality. Age of Your Plumbing System The lifespan of plumbing systems varies depending on the type of pipes used. For example: Galvanized steel pipes can last 20-50 years. Copper pipes have a lifespan of around 70-80 years. PVC pipes can last indefinitely under ideal conditions, but older versions may degrade over time. If your home is older and has not had its plumbing updated, it may be time to assess whether your system is still in optimal working condition. Homes built before the 1980s are especially prone to having outdated and deteriorating plumbing systems. Visible Corrosion or Rust on Pipes If you can see your pipes and notice rust or corrosion on their surfaces, it’s a red flag. While surface corrosion can sometimes be cleaned or treated, if it’s widespread, it’s a good indication that the pipes are weakening. Corroded pipes are more prone to leaking, breaking, or causing water quality issues, which makes replacing them a wise choice in the long run. Recurring Drain Blockages A clogged drain now and then is normal, but if blockages are frequent across multiple drains in your home, it could be a sign that your pipes are deteriorating. Over time, debris, minerals, and sediment can accumulate in your pipes, leading to blockages that are difficult to clear. In some cases, outdated or damaged pipes can even collapse, necessitating a full replacement. The Dangers of Ignoring Pipe Replacement Delaying a necessary pipe replacement can lead to more serious issues, some of which may require costly emergency repairs or even cause extensive damage to your home. Water Damage One of the biggest risks of failing to replace aging pipes is water damage. Leaks or bursts can cause significant damage to your walls, ceilings, and floors. Water damage can also promote the growth of mold and mildew, which are harmful to your health and expensive to remove. Structural Damage If leaks go unnoticed for an extended period, the structural integrity of your home can be compromised. Water can weaken the foundation, beams, and other vital components, leading to long-term issues that are difficult and expensive to repair. Higher Water Bills Even small leaks can add up over time, leading to skyrocketing water bills. If you notice a sudden spike in your water usage, it’s worth investigating whether your plumbing system is the culprit. Replacing old pipes can prevent leaks and reduce water waste, saving you money in the long run. Types of Pipes and Their Benefits When considering a full pipe replacement, it’s important to understand the different types of pipes available and their respective benefits. Here are the most common options: Copper Pipes Copper is a time-tested material known for its durability and corrosion resistance. Copper pipes have been used in plumbing systems for decades and can last up to 80 years. While copper is more expensive than some alternatives, its longevity and reliability make it a worthwhile investment for many homeowners. PEX Pipes Cross-linked polyethylene (PEX) pipes are flexible, resistant to corrosion, and easy to install, making them a popular choice for modern plumbing systems. PEX pipes are also less likely to burst in freezing temperatures, which makes them a great option for areas with fluctuating climates. PVC Pipes Polyvinyl chloride (PVC) pipes are lightweight, affordable, and resistant to corrosion. They’re commonly used in drain, waste, and vent systems but are not typically recommended for water supply lines, as they can degrade under extreme heat. CPVC Pipes Chlorinated polyvinyl chloride (CPVC) pipes are similar to PVC but with added durability for use in hot and cold water supply lines. CPVC pipes are resistant to corrosion and easy to install, making them a cost-effective option for many homeowners. Is Full Pipe Replacement a DIY Project? While some plumbing tasks can be handled by handy homeowners, a full pipe replacement is a complex job that typically requires the expertise of a professional. Replacing pipes involves: Cutting into walls or floors. Shutting off the water supply. Safely removing and disposing of old pipes. Installing new piping systems. Attempting a full pipe replacement without proper knowledge or experience can lead to mistakes that may result in costly repairs down the road. It’s always best to rely on a licensed plumber who can ensure the job is done correctly and efficiently. Why You Should Consult a Professional

Scroll to Top
Chrome Logo Web Transparent

Scheduled an Appointment